Selasa, 28 April 2009

Add Missing Embedded Comments Form to Blogger

Today I will show you how to fix your Blogger template if the embedded comments feature is missing or not working. I decided to write this article because I have noticed that the embed a comment below the post feature is often not working in many Blogger custom templates available for download. This is usually because many of these templates were released prior to Blogger enabling embedded comments.

If you have downloaded a custom template that has embed a comment missing then read on as I will show you how to insert the code for embed a comment form into your template. Inserting code into a blog template can be challenging for some but if you follow these instructions it is not beyond even virtual beginners.

1. Login to Blogger if you are not already logged in

2. Navigate to Settings > Comments. Under Comment Form Placement make sure the Embedded below Post radio button is set. Save any changes you make.

In Blogger Settings Comments Set Comments to Embedded

3. Navigate to Layout > Edit HTML

4. I strongly recommend you back up your template by downloading it to your computer before proceeding

4. Check Expand Widget Templates

5. Use CTRL + F to bring up the Blogger Toolbar

6. Look for the following code block by entering <span class='paging-control-container'> into the find box on the toolbar. Note if you don't have this code look at the alternative option below #7 in this post

<b:if cond='data:post.commentPagingRequired'>
<span class='paging-control-container'>
<a expr:class='data:post.oldLinkClass' expr:href='data:post.oldestLinkUrl'>
<data:post.oldestLinkText/>
</a>
<a expr:class='data:post.oldLinkClass' expr:href='data:post.olderLinkUrl'>
<data:post.olderLinkText/>
</a>
 
<data:post.commentRangeText/>
 
<a expr:class='data:post.newLinkClass' expr:href='data:post.newerLinkUrl'>
<data:post.newerLinkText/>
</a>
<a expr:class='data:post.newLinkClass' expr:href='data:post.newestLinkUrl'>
<data:post.newestLinkText/>
</a>
</span>
</b:if>


7. Paste the following code into your template immediately after the code block above and before this line of code <div id='backlinks-container'>

<p class='comment-footer'>
<b:if cond='data:post.embedCommentForm'>
<b:if cond='data:post.allowNewComments'>
<b:include data='post' name='comment-form'/>
<b:else/>
<data:post.noNewCommentsText/>
</b:if>
<b:else/>
<b:if cond='data:post.allowComments'>
<a expr:href='data:post.addCommentUrl' expr:onclick='data:post.addCommentOnclick'><data:postCommentMsg/></a>
</b:if>
</b:if>
</p>
</b:if>

Enter the Embed Comments Form into Blogger Template
Alternative Option
If you don't have the code as mentioned in #6 you will likely have the following:

<p class='comment-footer'>
<b:if cond='data:post.allowComments'>
<a expr:href='data:post.addCommentUrl' expr:onclick='data:post.addCommentOnclick'><data:postCommentMsg/></a> </p>
</b:if>

In which case replace with this code:

<p class='comment-footer'>
<b:if cond='data:post.embedCommentForm'>
<b:if cond='data:post.allowNewComments'>
<b:include data='post' name='comment-form'/>
<b:else/>
<data:post.noNewCommentsText/>
</b:if>
<b:else/>
<b:if cond='data:post.allowComments'>
<a expr:href='data:post.addCommentUrl' expr:onclick='data:post.addCommentOnclick'><data:postCommentMsg/></a>
</b:if>
</b:if>
</p>
</b:if>

8. Click on the Save Template button to save your template changes

9. Click on the View Blog link and test your embed comment feature by clicking on the number of comments link found at the bottom of each post. Notice that the post will now be displayed along with the embed a comment form below the post


Troubleshooting
As there are many variations amongst templates neither of these options may work in which case try this solution from Blogger Buster:

Find: <b:include data='post' name='comments' />

Immediately below this line add the following line:
<b:include data='post' name='comment-form'/>


In this tutorial I have shown you how to add the embed comments form into your custom Blogger template if it is missing so that visitors can comment easily.

Related Articles
Embed a Comment Form in Your Blogger Posts
Sabtu, 25 April 2009

Choose Your Own Blogger Post Date

In this tutorial I will show you how to set a different date from the actual date when posting to your Blogger Blogspot blog and discuss some of the benefits and uses of setting a different date.

Benefits of Setting a Different Date
Blogger permits a Blogger webmaster to set any publication date for a post they choose. This flexibility means that when you publish your entry it can be published retrospectively, in the here and now or for a future date. There are a variety of reasons for setting a particular publishing date for a post:

Set a Retrospective Publication Date
Some examples of situations where you may find it useful to set a post to a retrospective date are:

In order to keep continuity with a sequence of articles. You might use this feature if you forget to post an article in a sequence or decide afterwards to add an extra article to the sequence.

Another application for the retrospective date feature is to create a page such as an About page and attribute a specific date to it. I have gone back and written an About page on several of my blogs long after I have set them up. It is possible to go back several years if you wish. I would recommend setting the date of your About page to prior to your first post so that it appears at the beginning of your feed.

Bear in mind when posting to a retrospective date that the post will still appear in your recent posts feed even though you set a date in the past. While this can be annoying at times it is not much of a problem unless you rarely post to your blog.

Set a Future Publication Date
It is very handy to set a future publication date for your blog entries. One obvious time is when you go on vacation and want to stagger the publication of posts you have already written. Blogger allows you to set up your posts to be published on a specified date and time simply by setting a future date and time.

If you write a lot of articles about a particular theme it can be very useful to publish them in a set sequence. Blogger will allow you to set a future date for each article so that they can be published in the sequence you have chosen. For instance you might have written 7 articles on a theme and wish to publish them every 2 days over two weeks. Blogger will allow you to choose a future date for each of the articles and schedule them for publication on that user defined date and time.


How to Set a User Defined Publication Date

1. Create a post for your Blogger blog as usual

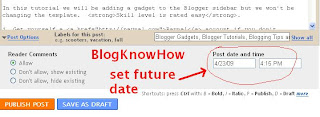
2. Click on the Post Options link found at the bottom left corner of the Compose box and directly above the Publish Post button

3. Set the specified date and time you wish your post to be published on

Set date options for Blogger posts
4. Click on the Publish Post button

If you have set a retrospective date your post will be published immediately and you will be able to view it in your blog archives.

Scheduled Blogger Post Message
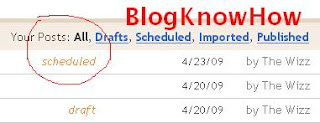
If you set a future date your post will be scheduled for publication. Click on the link to Edit Posts and view your post in the list. It should be at the top of the list. Notice that it will marked "scheduled" in red. When the exact date and time set is arrived at Blogger will publish your post automatically.

Blogger identifies posts as scheduled in Edit Posts list

In this tutorial I have discussed reasons why you might choose to set your own user defined post date for your Blogger posts. I have also shown you how to go about setting a different post date through the Post Options feature in Blogger.

Jumat, 24 April 2009

Get More Comments on Your Blogger Blog

Do you want to get more comments on your Blogger Blogspot blog? Maybe you are wondering why you are not getting the level of comments on your blog that you had hoped for? Well don't panic. Traffic takes time to build and commenting on new blogs is always slow at first. You could resort to creating your own comments but I strongly advise against it. Apart from being unethical I find you can often spot ingenuine comments a mile away and its a major turn off. Instead take heart. In this article I will be focusing on 7 strategies you can employ to encourage your readers to comment and to build a great community around you in the process.

Reasons Why a Visitor Might Post a Comment
To start with let's look at some of the reasons people comment in the first place. I find readers tend to comment on my blog when they have found a solution to a problem or understood something that they haven't known about before. Another reason to comment is that they may ask how to questions especially about technical problems or ask for advice. If I write something contentious readers may post to let me know they don't agree or conversely they whole-heartedly agree. Visitors post comments when they have been moved in someway.

Blog Visitor Behaviour
Visitors arrive at your site with an agenda. They are usually looking:

for answers to help them solve a problem

to be entertained, uplifted or informed

to connect with other like-minded people

Visitors get an impression of your blog the moment they arrive at the landing page. They make up their minds in seconds about the value of your blog. If their attention is grabbed right away by the look and feel of your blog they might hang around and read an article or two. Mostly people are looking for fairly instant gratification so make sure you give it to them by making your blog worthy of visits.

It is well documented by other bloggers that readers are more likely to comment if they see that your blog is well patronized and already has some action going on. If it's dead most will leave straight away. Most visitors will not get beyond the first page they arrived at. That's the reality of blogging. However, if your articles are unique and cutting edge in some way then you will capture some of the other 20% who will take more than a passing look. Humans being humans people are more likely to post a comment when they are not the first. Most of us don't want to be first to arrive at a party right and this applies to blogging as well.

7 Strategies to Encourage Visitors to Comment

Don't PanicStrategy #1 - Don't Panic - Be Patient - Build Traffic
If your blog is not getting much traffic commenting will be slow too. If your blog is new, say less than a year old, give it time. Once someone comments often this leads to further comments. Make sure you have attended to SEO and created sufficient backlinks to generate site traffic.

Strategy #2 - Always Post Quality Content
For visitors to post comments on your blog they have to have some kind of warm up to the content. It's that simple. Make sure you post frequent articles of a high quality.

Strategy #3 - Always Respond to New Comments
I make it a rule on my blog that I post a response to every comment made. I want people to come back and to know that there is someone there at the other end. A leading 6 figure blogger, Yaro Starak, made the comment recently that he noticed a sharp decline in comment posting when he stopped responding to each individual comment. Respond to comments and your readers are more likely to return and to even comment again.

Strategy #4 - Ask Questions of Your Readers
Some readers like to engage and you are more likely to capture these visitors by posting a question on your blog like What's the most annoying thing about Blogger? Tell us about your experince for example.

Strategy #5 - Write articles that reference or focus on other Bloggers
Yaro Starak who makes about $40,000 per month from blogging suggested in a recent newsletter that you not just mention other bloggers in your articles but write an article around them as a way to encourage the other blogger to comment on your blog. Haven't tried this one yet but it is on my list so I will let you know how I get on. If you have tried it already what happened?

Strategy #6 - Make it Easy For Visitors to Comment
For visitors to leave comments the commenting process has to be easy. Make sure the following are correctly set on your blog by navigating to Settings > Comments:

Set Show Comments to Yes

Set Allow Anyone to Comment

Set Embed Comment Below Post

Set Moderation to Always (more work but prevents spam)

If you are using a custom template you may have trouble with the embed comment feature. Please refer to my article about how to update your template to incorporate the embed comments below posts feature.

Blogger Settings Comments
Strategy #7 - Comment on Other Blogs
It is a good rule of thumb to comment on a visitors blog if they take the time to comment on yours. I'm not talking about spamming someone else's blog just writing a comment about some aspect of their blog that you appreciated, admired or interested you. And of course you can get a link back to your blog in the process.


This article focused on some of the reasons why visitors leave comments on a blog and discussed some basic blog visitor behaviour. I discussed 7 strategies that will help you encourage visitors to comment more. If you have any other ideas about encouraging comments I'd love to hear them. How about posting a comment to let me know how you encourage your readers to comment.

Kamis, 23 April 2009

Add Paypal Donate Button to Blogger

If you want to make a few bucks from all the hard work you are putting into your Blogger blog then consider adding a Paypal donate button to your Blogger blog (Blogspot blog).

Paypal Donate ButtonAdding a donation button will encourage all those happy readers to say a big thank you for helping them out. Not everyone will donate but you will get the odd generous soul who will willingly donate some chump change to shout you a coffee.

In this Blogger tutorial we will be adding a gadget to the Blogger sidebar or alternatively you could place it in the foooter of your Blogger template. We will be using a widget to contain our Paypal Donate Button and will not be changing your Blogger template. If you wish to place the donate button into your Blogger posts see the end of this Blogger tutorial for details.

Skill level is rated easy.

How to Add a Paypal Donate Button to Blogger (Sidebar or Footer Gadget)
Note: Updated on January 20 2012 to take account of new Paypal interface

1. Get yourself a Paypal account if you don't already have one

2. Login to your Paypal account

3. Click on the Merchant Services tab

Select Paypal Merchant Services Tab
4. Choose Donations from the list of key features displayed in the right sidebar of the PayPal Website Payments Standard Option (first of 3 payment solutions)
Note Paypal have changed its interface. You now need to select PayPal Website Payments Standard from Merchant Services drop down and then under the buttons in option 1 you will see in pretty tiny writing I must say "There are also buttons for donations and gift certificates." Click on donations.

Select Donations link in Paypal from Paypal Website Payments Standard Options 1 to add a donations button to Blogger Blogspot blog

5. From the Paypal Create a Donation Button screen choose Create Your Button Now link (one of two).


6. Stick with the default button unless you wish to customize it

7. Choose your currency depending on your needs and location

8. Choose Donors enter their own contribution amount radio button unless you want to have a set amount

Paypal Create Button Steps
9. Ensure the Secure Merchant ID radio button is selected. This will prevent spammers getting hold of your email address

10. At Step 2 it is worth saving your button

11. At Step 3 Customize your checkout page by allowing donors to write a short comment by selecting the Yes radio button to special instructions to seller

12. Select the No radio button for Customer's Shipping Address

13. Select the Create Button button

14. Once Paypal creates the donate button code copy it by right clicking your mouse and choosing copy

15. Logout of Paypal

16. Login to Blogger if you are not already logged in

17. Go to Design > Page Elements

18. Click on the Add a Gadget link in the sidebar

19. Choose HTML/Javascript widget from the list provided

20. Paste the button code into the Content box of the dialog box that appears by placing the mouse inside the box and right clicking the mouse and then paste

21. Select a title like "Shout Me a Coffee Today!" or whatever you would like

22. Click on the Save button

23. Drag and drop your new donation gadget into the spot you want it to appear in

24. Click the Save button to ensure your changes are saved

25. Click View Blog to see your new donate button in the sidebar of your Blogger blog

26. Click on your new donate button and you will be taken to the Paypal Checkout screen

Paypal Checkout screen

Tips and Troubleshooting

  1. To Add a Paypal Donate Button to Blogger Posts
    The following instructions will add a Paypal Donate button to all new Blogger posts. Note previous posts will not be changed. You will need to hard code the button into your Blogger template to have the Paypal Donate button added to every Blogger post. (Please ask if you need help with this)

    1. Follow the directions (steps 1-16) as above to get your Paypal button code
    2. In Blogger go to Settings > Formatting
    3. Paste the Paypal Donate Button code into the Post Template box
    4. Save changes
    5. Click on New Post to see that the code will be automatically inserted at the foot of each new post. (you will need to be in Edit Html mode to see the code)

  2. To Add a Paypal Donate Button to Individual Blogger Posts
    1. Follow the directions (steps 1-16) as above to get your Paypal button code
    2. In Blogger go to the post you wish to insert the button code into
    3. Insert the button code taking care to change all instances of double quotes to single quotes
    4. Save post and publish as normal. (If you have trouble with the preview post button in the old editor in Blogger click on compose and then edit html)


This Blogger tutorial has walked you through the steps needed to add a Paypal donate button to your Blogger blog (Blogspot blog) including how to configure your Paypal button at Paypal. I have covered adding the button as a sidebar gadget or footer gadget or alternatively added to Blogger posts. Have fun!


Related Posts
List of Blog Know How Tutorials for Blogger Blogs
Tips for Adding Google Adsense to Blogger
Better Placement of Google Adsense in Blogger
Add Google Adsense to a Blogger Header
Bloggers Guide to Google Adsense Myths
Add Google Adsense or Banner Above Blogger Header
Blogger Guide to Better Google Adsense Placement
Make Money with Adsense Keywords and Blogger
Make Money By Adding Banner Ads to Your Blogger Blog
5 Easy Ways to Make Money from Blogger
Add Chitika Ads to Blogger Blogspot
Make Money Add an Amazon Widget to Blogger
Add Amazon Product Links to Blogger Posts

Senin, 20 April 2009

Add a Feedburner FeedFlare to Blogger Feed

If you have burned your Blogger Blogspot blog feed at Feedburner you can easily add a FeedFlare to the footer of the feed. FeedFlare helps you to distribute, inform and create a community around your content. Adding a FeedFlare to the feed of your blog allows readers to select from a range of social bookmarking links which appear at the end of each post. FeedFlare offers subscribers some easy ways to email, tag, share, and bookmark your blog content by linking them with a range of services such as Stumble Upon, Digg This, Facebook, Technorati, del.icio.us and Mixx.

It is not difficult to add a FeedFlare to your Blogger feed but it does require you to add a snippet of code to the template of your blog. Don't be put off as I will guide you through this process by providing a step by step walkthrough. This tutorial caters for all levels of technical knowledge from the newbie Blogger to the experienced Blogger.

To see a FeedFlare in action right now check out the end of each post in the Blog Know How feed


How to Add a Feed Flare to Your Blogger Feed
If you have yet to burn your Blogger feed at Feedburner please refer to my articles Blogger RSS Feeds and Feedburner and Burn Blogger RSS Feeds at Feedburner for instructions on how to burn your feed and benefits of burning your blog's feed at Feedburner.

1. Login to Feedburner with your Google Account. From the My Feeds page click on the link to your blog

2. By default you will be taken to the Analyze page so you need to select the Optimize tab from the menu

3. Select FeedFlare from the Side Menu

4. To create a simple FeedFlare check the boxes of the options you would like. At a mininum I suggest you select email and comments count (for blogger) in addition to Stumble Upon, Digg This, del.icio.us and Facebook.

5. Once you have selected the desired options you can reorder them in the Preview/Reordering box below using drag and drop to shuffle the links around. I think it is a good idea to have comments either at the beginning or the end of the list as readers are more likely to notice it in this position

6. Click on Activate. Do not close this window as we will be returning here.

7. In a new window login to Blogger if you are not already logged in and navigate to Layout > Edit HTML

8. I strongly suggest you back up your template as a precaution by downloading it to your computer

9. Use CTRL + F to bring up the toolbar and enter the following code into the search box
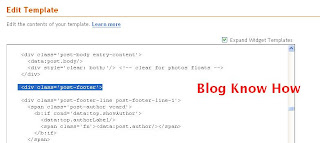
<div id='post-footer'>
Find Post Footer Code
10. Return to the FeedFlare page at Feedburner and select Blogger from the drop down menu at the bottom of the page to get the HTML Feedburner code. A dialog box will appear with some instructions. Copy the code found in item #1. Editing Blogger Layouts. To copy right click your mouse and choose select all to highlight the code and then right click again and choose copy

11. Paste the Feedburner code into your template directly below the line of code in your template you just located <div id='post-footer'>
Add Feedburner FeedFlare Code into Your Blogger Template
12. Click on the Save Button

13. Return to Feedburner. Immediately below your blog's title and just above the Analyze tab you will see two icons. Click on the RSS icon (left button) which will bring up your blog feed.

Feedburner feed icon
14. Scroll to the bottom of the first post and you will see your new FeedFlare in action.

FeedFlare in Blogger Feed Redirected by Feedburner

Other FeedFlare Options
For smarter looking links you may choose to customize the FeedFlare's appearance by tweaking the CSS.

To prevent stealing of your original content otherwise known as blog scraping or splogging you can add personal FeedFlares such as a permalink to a copyright notice and a permalink to you the author of the blog.


In this tutorial you have learned how to create a FeedFlare at Feedburner which appears at the bottom of each post in your Blogger blog's feed. By adding the FeedFlare to the footer of your Blogger blog you help build an online community around your content by offering your readers some choices about how they share, link to and act on the information contained in your blog

Related Articles
Blogger RSS Feeds and Feedburner
Burn Blogger RSS Feed at Feedburner

Kamis, 16 April 2009

Bloggers Guide to Google Adsense Myths

I get a lot of interest in my articles about Google Adsense on Blogger Blogspot blogs. In this article I discuss 6 common myths about Google Adsense that will help you get real about placing Adsense on your Blogger blog.

Google Adsense Myths Every Blogspot Bloggers Needs to Know
There are a number of myths about Google Adsense which can lead new bloggers in particular into believing that they need only slap a few Google Ad units on their blog and they will become instant millionaires. The reality can be a lot different especially when you consider that 95% of all blogs receive less than 100 visitors per day. Adding Google Adsense to your blog can generate some income but there is a need to be realistic. Here are 6 myths about Google Adsense that every blogger needs to know:

Myth 1. Google Adsense is a Get Rich Quick SchemeGoogle Adsense is Not a Get Rich Quick Scheme
False. Only a small percentage of bloggers actually make a living from their blog. It is definitely possible to make some money from Google Adsense Ad units but bear in mind that making money from your blog is commensurate with many factors such as types of advertising, placement of advertising, quality of your content, regular posting, number of articles, SEO, backlinks to your site, number of visitors to your blog to name just a few. The more articles you write, the more posts indexed in search engines like Google and Yahoo which may lead to increased traffic but not necessarily. The bottom line is that for your ads to be effective your blog needs to receive traffic so concentrate your efforts in this area and make sure that your blog is worth visiting once your visitors get there.

Do Your Sums
As Google Adsense itself says it is difficult to predict earnings however there are some general pointers to guide you. For instance if your blog receives 100 visits per day your likely revenue from Google is probably about 10 cents per day assuming that 1 in 100 people click on some form of Google advertising on your site and the page CTR is about 0.20%. Over a year that equates to about $36.50. Not a fortune in anyone's book. Likewise if your blog is fortunate enough to receive 1000 visitors per day you are looking at an annual income from Google Adsense of $365.00.

100 Visitors per day = Earnings $36.50 per year

1000 Visitors per day = Earnings $365.00 per year

5000 Visitors per day = Earnings $1825.00 per year

10000 Visitors per day = Earnings $3650.00 per year

The above figures are an optimistic view. I have not allowed for the fact that many of your visitors will be repeats so the likelihood of a repeat visitor clicking on an ad unit is less than for that of a new visitor. On this basis your earnings could be much less.

Google Adsense and Affiliate Marketing
About 95% of Bloggers would have less than 100 visitors to their blog a day. If your blog is in this category then Google Adsense alone will not allow you to quit your job and become a full-time blogger. You will need to display other forms of advertising on your blog as well before your blog will start to pay. Check out my article on other forms of advertising that may be suitable for your Blogger blog including displaying Affiliate Marketing banners.

Affiliate marketing banners can work as a form of advertising. Consider that if 1 site visitor in 100 actually buys something worth $50.00 you will immediately earn $5.00 assuming you receive 10% of the sale as a commission. Even if only one in 500 clicks through to the merchant and buys something you will still be ahead of the revenue earned from Google ads for the same number of visitors. $5.00 from Affiliate Marketing versus 50 cents from Google Adsense. In many ways Affiliate Marketing is a more profitable marketing strategy than having heaps of Google ads on your blog. However, in my experience a good mix of both is the way to go


Myth 2. Displaying More Ads on My Blog Will Earn More Money
False. Some bloggers mistakenly believe that placing more Google Adsense units on their blog will yield higher earnings. Sadly this isn't the case at all. By putting more Ad units on your blog you may actually reduce your earnings. There is a risk that the highest performing Ad units will shift to positions that are less frequently clicked on. For instance while the top right hand corner is a prime place for an advertising banner because it gets viewed by the most eyeballs it is also a spot that tends to get disregarded by savvy visitors who recognise it as an advertising zone and avoid it. At the same time a 336x280 Ad unit with a higher CTR is likely to display Google Ad units which pay less because the highest CTR has been transferred to the 468x60 Ad unit.

Myth 3. More Traffic Equates to Higher Google Adsense Earnings
Not necessarily. Depending on your blog's content it might not always be possible to drive a lot of new visitors to your blog and you rely more heavily on your repeat traffic. However, due to the familiarity of the ad placement on your blog repeat visitors are less likely to click on your Ad units than new visitors. While you can expect more clicks on your ad units as traffic increases there is no guarantee that Google Adsense on your blog will deliver the kind of earnings you might expect.

Myth 4. The Ad Format of Google Adsense Ads is Not Important
False. The ad format you display on your blog is very important. You can earn more from some ad formats than others. For instance it is generally considered that the wide Google Adsense ads (336x280, 300x250 or 250x250) perform best. I like to position one of these directly above my first post.

Link units can be profitable too if strategically placed. One of the best locations for link units is in or just below your blog header as many people are used to looking there for a navigation menu. A 728x15 linked ad unit just below your horizontal navigation menu will very likely yield good results.

Myth 5. Placement of Google Adsense Ad Units Doesn't Matter
On the contrary where you place Google Adsense can be critical to earning revenue from your blog. One of the best places to position Adsense is above what's known as the fold. The fold is the top area of your blog visible to your visitors without them having to scroll down. A 336x280 ad unit in this space works well because on arrival at your blog the visitor sees what they are looking for and clicks on it. For instance if your blog is about mountain biking then Google Adsense will very likely serve up ads about cycling equipment, cycling tours etc. For the visitor seeing exactly what they are interested in on arrival is a definite bonus which may lead them to click on your Ad unit.

Myth 6. To Make Money from My Blog I Need to Add Google Adsense
False. While Google Adsense is by far the most popular Advertising Network it is not the only advertising option. There are some good alternatives like AdBrite and Chitika. Let the type of blog you have govern your decisions around which advertising mix you employ rather than just going for Google Adsense because its the easiest.


In this article I have explored 6 common myths about Google Adsense that every Blogger Blogspot blogger needs to be aware of when placing Google Adsense on their blog. This article will hopefully help you do a reality check and help you recognise that while you may be one of the 5% of bloggers sitting on a goldmine Google Adsense won't transform you into a millionaire overnight.


Related Articles
Make Money - Add Affiliate Banners Ads to Blogger
Google Adsense Tips for Blogger Blogs


Resources - Blogger EBooks
Blogging to the Bank 3.0 - The Best Blogging EBook on the Net!

Learn How To Make Money Blogging - Blog Mastermind Led By Yaro Starak

Rabu, 15 April 2009

Add a Welcome Message to Blogger Blog

Would you like to welcome visitors to your Blogger Blogspot blog with a simple welcome message? In this tutorial I will show you how to add a short welcome message to your Blogger sidebar using the text gadget. This tutorial is aimed at beginner bloggers and those new to Blogger.

How to Add a Welcome Message to the Blogger Sidebar

1. Login to Blogger if you are not already signed in

2. From the Dashboard select the link to your blog. If you have more than one blog you will need to choose from a list of your blogs displayed on the dashboard

3. Navigate to the Layout > Page Elements page by clicking on the Layout tab and then the Page Elements link.

4. Click on Add a Gadget in the sidebar of your blog

Add a Gadget to Blogger Sidebar
5. Choose the Text gadget from the list.

6. Paste the following into the content box of the gadget:

To Your Blog Name. Add your own welcome message here. Write something that will tell readers about your blog

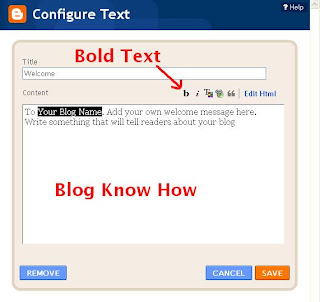
7. Bold Your Blog Name by highlighting the Your Blog Name text and selecting b from the formatting options

Add Formatting to Welcome Message such as Bolding
8. Type the word Welcome into the Title box

9. Click on the Save button to save the gadget

10. Click on the Save button in your template to save your changes

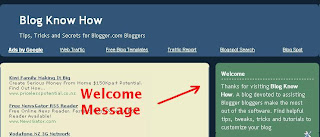
11. Click on View Blog and admire your new welcome message which will appear at the top of your blog's sidebar

Welcome Message Added to Blogger
12. Now you have an idea of what it looks like click on the back button of your browser to return you to the Page Elements screen

13. Click on the edit link of your new gadget

14. Change the text to whatever you wish and save changes

Change Welcome Message to suit your Blogger blog
15. Save the changes to the template

16. Click on View Blog to see the changes you have made

Add Welcome Message to Blogger

To Edit the Content of the Text Gadget
Select Edit by clicking on the edit link of the gadget in the sidebar and changing the contents or title and saving the changes

Edit Text Gadget in Blogger Sidebar
To Remove the Gadget
Select Edit by clicking on the edit link and choosing the remove button

In this tutorial for newbies and beginner bloggers I have outlined the steps necessary to add a text gadget to the sidebar of your Blogger Blogspot blog. By way of example I have shown you how to add a welcome message to your blog sidebar

Minggu, 12 April 2009

Submit Blogger Blog to Blog Directories

This article discusses the benefits of submitting your Blogger Blogspot blog to blog directories and provides a comprehensive list of some of the best blog directories on the internet. This is an introductory article aimed at the new Blogspot blogger but is suitable for any blogger who wishes to build site traffic quickly.

Benefits of Submitting to Blog Directories
By adding your Blogger Blogspot blog to blog directories you are likely to increase your site traffic expotentially. If your site has been languishing in the doldrums and not getting the kind of traffic you were expecting it could be that you haven't generated enough inbound links to your site. Signing up to some top performing blog directories will create quality backlinks and expose your site to many potential visitors.

I have signed up for each blog directory in the recommended list below and in all cases have found that they have generated at least some site traffic. A few have boosted traffic considerably and have helped me establish new blogs quickly by generating an audience. One or two blog directories have more than exceeded my expectations. TopBlogList and Blog Catalog fall into this category attracting 10 or so unique visitors within a day of sign up.

How do Blog Directories Work?
Most blog directories require that you place their button somewhere on your blog. In some cases the button's function is to track visitors from your site to the directory. Some buttons may reflect the ranking of your blog in relationship to other blogs in your chosen category within the directory. If you see a number appear on the button it denotes your blog's position.

Get Organized Before You Begin Submitting to Blog Directories
To add your blog to a blog directory you first need to register. The sign up process will run more smoothly if you get a little organized before you begin. I suggest that you take the following steps first:

Craft a description for your blog of around 400 words

Check your feed details as you may be asked to provide the URL of your feed. This is especially important if you have burned your feed at a feedburning service like Feedburner

Make sure you know the exact URL address of your site. If in doubt navigate to your home page and check the the URL in the address bar

Decide which email address to use. Blog directories tend to create a lot of mail so unless you want to have your mailbox clogged up consider carefully which email address would be best. You may decide to start a new email address specifically to handle this kind of mail.

Decide on a username and password and stick to it throughout as it will make life a lot easier than trying to remember twenty different usernames and passwords

Determine your top six keywords and keyword phrases as most blog directories ask you to provide these tags

With such a big choice of blog directories to submit to I have found it pays to be systematic. Keeping a list of where you've signed up in Notepad or similar will help guard against double ups.

How to Add a Blog Directory Button to Your Blogger Blog
Most blog directories send out an email on sign up. Once you click on the link you membership will be confirmed. In most cases you will then be directed to a menu where you can begin adding your blog or blogs to the directory. Once you have entered the details of your blog the directory will generate the button code which can be copied and pasted into a HTML/Javascript widget. It is a good idea to place all buttons together in one widget for convenience and to reduce loading time. If you are uncertain how to add this widget to your Blogger blog please refer to my earlier post about Adding third party HTML/Javascript code to a sidebar widget.


List of Recommended Blog Directories to Get Started
All of the blog directories listed below I have personally signed up for as mentioned above. The blog directories are in no particular order except that I have put Blog Catalog and Top Blog List first because I have found them good.


Blog CatalogMy BlogCatalog BlogRank
Blog Catalog ReadersBlogCatalog is a social community for bloggers and one of the largest blog directories on the internet. It is a good option to begin promoting your own blog and to connect with other bloggers. BlogCatalog offers lots of linking options. You can add a button, a link to your blogroll or verify your site using a meta tag and dispense with a visible site link altogether. In addition you can add a Blog Catalog Readers widget to your blog like the one you see here.

Top Blogging Bloggers Guide to Customising Blogspot Blog
Easy sign up. Only one keyword phrase permitted so make it a goodie. Ranking is based on unique visitors

TopBlogArea Top Blog Area
This blog directory tracks unique visitors. No option for visitors to vote. Every month statistics are reset to zero to give everyone a chance of being highly rated

TopBlogLists
Ranking of pages is done according to the number of unique visits each blog brings in to Top Blog Lists

Blog Top Sites
A nice control panel for site management. Ranking of pages is done according to the number of unique visits each blog receives in a month.

Top of Blogs Top of Blogs
Ranks blogs according to the number of visits a blog receives in a certain amount of time (daily, weekly, monthly, etc.).

BlogTopList Blog Top List
Requires two buttons to be placed on your blog. One is the tracking button which tracks number of visitors and displays the rank of your site. The other button is the voting button. If a visitor votes for you it is equal to 100 unique visits .

BlogPulse
Tracks thousands of blogs. Submit yours. Try doing a check first though as you may be surprised to find your blog has already been located automatically.

BlogFlux
Over 140,000 blogs in the Blog Flux directory. Nice Control Panel interface.
Sign up is immediate although all blogs added are manually checked so there is a time delay before your blog will be included.

Blogorama
Top 100 most popular section. Score increases depending on variables like users ratings, incoming traffic and outgoing traffic.

My Blog Directory My Blog Directory
Blog of the day feature chosen on the basis of the number of unique visitors directed by the blog to the directory per day. The blog of the day gets the whole of the site traffic fof that day. Blogs are listed randomly so that every blog gets equal exposure.


Other Blog Directories You May Be Interested In
I have not necessarily submitted a blog to these blog directories but I am providing a link if you want to follow it up. Not sure about overall chances of an increase in traffic with these ones though.

Bloggernity
Free Blog Directory
Blog Rankings


Lists of Blog Directories
For a longer list of blog directories try:
Great Blog Directories for a list of free directories

In this article I have discussed some benefits of submitting your Blogger Blogspot blog to blog directories. I have suggested ways to get organized to make the process less daunting and I have recommended some blog directories which I have personally signed up for to get you started. Adding your Blogger blog to these blog directories should result in an increase in site traffic. Good luck!


Related Articles
How to add a HTML/Javascript widget to the Sidebar of Blogger

Sabtu, 11 April 2009

Hannah Montana Movie

This Saturday, I braved the movie theatres along with several other loyal Hannah Montana fans to see the opening weekend of the Hannah Montana Movie. Now, I bet you wouldn't have picked me for a Hannah fan...considering I'm several years past junior high.


But, I'll admit, I'm a closet Hannah Montana junkie, and I'm not the only one. I got into watching Hannah on Saturday mornings with my friend Stephanie, who's dad is the right-hand cowman on the ranch. Last spring when I was stuck inside with my broken ankle, Stephanie came to visit me and we would watch That's So Raven, followed by Hannah Montana, followed by The Suite Life of Zack and Cody. Ironically, this year at the Lone Star Edition sale I also found out that another adult, Laci Bracewell, also loves these three shows. So this gave me hope that I'm not the only person above age 14 who is addicted to this stuff!


In addition to the Saturday ritual of watching HM, I also have purchased a few signature Hannah items....again -- all for gifts for my friend Stephanie. But anytime there is a birthday or Christmas, you can be sure we're getting her something related to the teen pop star idol. These gifts range from movies, t-shirts....and the all time best --- a REAL Hannah Montana blonde wig, which we all put on and model for a good laugh!


A few months ago during one of our Saturday 'girls mornings' we saw the preview for the movie, and we made a promise that we would go watch it together. As all loyal Hannah fans know, Friday was opening day. Of course there are no theatres in Boling, so our normal theatre is in Rosenberg which is near Houston. I went online to check it out on Friday morning (opening day) and all the tickets were sold out online.


I decided to check out another local theatre, which is Showplace 3 in El Campo. This theatre is quite a bit older, doesn't have stadium seating, doesn't show as current of movies, but it's a lot less crowded. As I find their web site, I am definitely suprised to see that this small town theatre is offering Hannah Montana on opening weekend!!! I'm thinking this is the hook up because surely it won't be as crowded and we can go.

So Stephanie and I make a plan to go to the early show at 1:00 p.m. We get there about 30 minutes early and to my suprise, there are plenty of seats. I'm even happier when our combined bill for two tickets is $4. One ticket at the other theatre is like $8.25 -- so I'm thinking this is a real deal.


As we sit down, the first thing I notice is that the background music they are playing in the theatre is the song "Hanging Tough" by New Kids on the Block. I think this is a random song, but I'm pleasantly suprised to hear the rest of the New Kids cd from circa 1990....considering I was in elementary school when it came out. I'm guessing this theatre needs to update their music collection.


I won't give away all of the secrets of the movie....but I have to say....it was really good. The music and songs by Hannah are great, and I really liked the new song that Taylor Swift sang on the movie. Rascall Flatts sang a few songs, and Billy Ray Cyrus also had a new song on there. I loved Hannah's outfits....I would love to have the dress she wore on her date! And I loved the hometown setting of Miley's hometown in Tennessee. I wish I could paint a chicken coop as good as Miley. And I might even download that Hoedown song on my ipod and see if I can figure out how to do that dance.

I'll also admit that I love Miley's new song -- The Climb. This performance was the finale of the movie...and I'm not too embarassed to say -- I got a little tear-y eyed. The movie had a great moral and it was one I'd recommend to anyone, young or old....especially if you like Hannah/Miley.

And...as Miley says....Life's always a climb....but the view sure is great :)

Jumat, 10 April 2009

Burn Blogger RSS Feeds at Feedburner

In this tutorial I will guide you through the step by step process of burning your Blogger feed at Feedburner, updating your blog settings to reflect the new feed and adding a RSS icon to the sidebar of your blog so your visitors can subscribe to your new RSS feed. Although redirecting your blog feeds through Feedburner is relatively straightforward I will be including some tips to simplify the process. This tutorial is suitable for all levels of technical knowledge but is particularly aimed at those readers new to blogging with Blogger.

There are lots of good reasons for burning your Blogger feeds with a free service like Feedburner. Among the advantages are better feed presentation, detailed tracking statistics and access to the large choice of feed readers available. For a full discussion of the benefits of burning your Blogger blog feed at Feedburner including an explanation of Blogger RSS feeds please refer to my article Blogger RSS Feeds and Feedburner.

How to Burn Your Blogger RSS Post Feed at Feedburner

If you want to add Google Adsense at the same time as burning your feed at Feedburner I suggest that you refer to my article on Adding Google Adsense to Your Blogger Feeds as this includes an explanation on how to do this. Otherwise follow the steps below to burn your post feed at Feedburner

1. Go to Feedburner and click on the Get Started link

2. Sign in to your Google Account if not already signed in. This will take you to your Feedburner Account page.

3. Enter the name of your blog in the Burn a Feed This Instant box and click the Next button

http://yourblogname.blogspot.com
Burn a Feed This Instant
4. A message will be displayed that you have more than one feed and asking you to choose. Select the RSS radio button for the RSS feed and click next

Identify Feed Source - Choose RSS
5. Feedburner will now display the proposed Feed Title and Feed URL. Unless you have a reason to change these accept by selecting the next button


6. You will now see the confirmation screen letting you know your feed has been burned. Select the Next Button to set up Feedburner Statistics options

7. Check the I want more statistics box to give you access to additional tracking statistics. Click on the next button

Click on Add Additional Stats
8. Feedburner will now inform you that it has successfully updated the burned feed you have just created.

9. Click on the Feedburner Analyze Tab at the top of the page and you will be taken to the Analyze Feed Stats Dashboard. At this stage you will receive the message: Your feed is so new, we’re still playing with the bubble wrap. It can take about a day before you will be able to see much action on your feed

Feedburner Analayze Screen
10. Under the title of your blog's feed in this screen click on edit feed details. This will give you the new name and URL for your feed. Copy the full feed address into Notepad or similar. Care needs to be taken as you will need to copy this in two parts. The new feed URL should be something like this:

http://feeds2.feedburner.com/YourBlog

11. In a new window login to Blogger.com and navigate to the Settings > Site Feeds section of your blog

12. Click on the Advanced Mode to switch from the basic mode.

13. Make sure that the Blog Posts Feed, Blog Comment Feed and the Per Post Comment Feed are all set to Full.

Blogger Site Feed Configuration for Feedburner Redirect
14. Paste the URL address of your new Feedburner feed in the feed address box provided. This is the URL address that you copied into Notepad previously

15. If you don't already have a copyright notice in the Post Feed Footer it is a good idea to enter one. I tend to use something like the following:

Copyright Your Blog Name 2009 at yourblogname.blogspot.com

16. Click on the Save button

17. Return to Feedburner and click on the Publicize tab

18. Follow the friendly graphic link to chickletize your feed. This will provide you with the code to place an RSS icon on your blog with a link to your new burned Feedburner feed

19. Choose the large orange icon entitled "Subscribe in a Reader" as we will be placing it in the sidebar of your blog.


20. Copy the code at the bottom of the page by right clicking the mouse and then select all from the menu followed by right click the mouse and then select copy

21. Return to your blog and navigate to Layout > Page Elements

22. In the sidebar select Add a Gadget and then HTML/Javascript. Paste the code into the content box by right clicking the mouse and selecting paste

23. Enter a title if you wish. I like to use Subscribe for Free myself as for a lot of people subscriptions often mean there is a cost involved.

Add RSS Icon to Publicize Your Post Feed in Blogger
24. Save your new widget

25. Use the drag and drop feature in the sidebar to position the widget in your desired location. Click on Save

26. Click on View your Blog to see your new RSS icon in the sidebar. If you now click on the RSS icon you will see your new Feedburner post feed in action

Feedburner Chickletize your RSS Feed - RSS Icon

This tutorial has shown you how to burn your Blogger Blogspot Feed at Feedburner, update your Blogger settings to take account of the new feed URL address and add a RSS icon link to your blog's sidebar which points to your Feedburner post feed.

Related Articles
Blogger RSS Feeds and Feedburner
Add a Feedburner FeedFlare to a Blogger Feed