Send us your photos of the Best Halloween Costume and we'll post our favorites here on the blog! We know that all of the RHD clients have some adorable little ones who are going to look as cute as ever in their costumes this year. Or, maybe you're an adult who likes to dress up too and you want to submit yourself in costume.
So send us your kids Halloween photos and show off your cute-ness (or scary-ness) to the rest of your friends at RHD!
Please send photos to rachel@ranchhousedesigns.com. We'll give everyone a few days to get their pics off their digital camera and post the photos here in a week or so!
Jumat, 30 Oktober 2009
Selasa, 27 Oktober 2009
Favorite October Ads

We sent all of our October ads to Courtney and asked her to pick her top 3, but she said there were so many she liked, she had to pick more! She said: "Overall great ads! I love the work y’all do. The ads I selected as my favorites really stand-out!" So here are this month's winners, in no certain order. Congratulations to these clients!

Clay Farms - At first glance, this ad stood out and caught my eye. There’s something attention-grabbing about a giant boar standing firm staring you in the eyes! Definitely attention-grabbing!


Dismukes-Ranch – Great use of colors and graphics. Love the image! The image and tagline “…Something New in the Barn?” entices me to read on.


V8-Ranch – Love the colors and typography. Eye-catching.

Senin, 26 Oktober 2009
Add or Change Background Image of a Blogger Template
In today's Blogger tutorial (Blogspot tutorial) I will show you how to both add a background image to a Blogger template if you don't have one already or change the existing background of your Blogger template.
I have chosen to write this article not because there aren't any how to articles already on the net but because they assume quite a bit of knowledge. I have taken a different tack with this post in that I assume you are an absolute beginner with no knowledge of Blogger templates.
For this reason I have provided some sample backgrounds for you to play around with. By just cutting and pasting these images you can see first hand how dramatically adding a different background to your Blogger template can change it. You will see that replacing your background image with these images isn't that difficult and hopefully it will give the confidence to branch out further and change the background of your Blogger template to suit your own needs. All that is needed is to insert a small snippet of code into the CSS styling section of your Blogger template and hey presto your Blogger template will take on a whole new look.
How to Change the Color of a Blogger Background (Default Templates)
If you are using a default Blogger template then you already have the option to change the background color to your own taste by going to Layout > Fonts and Colors. Some third party custom Blogger templates have this option too but by no means all. For instructions on changing the background color of custom templates see tips and troubleshooting below.
How to Add a Background Image to a Blogger Template
Tips and Troubleshooting
Today's Blogger tutorial (Blogspot tutorial) aimed at Blogger beginners continues the series on CSS styling for Blogger. You have learned how to add the background image to your Blogger template or change the existing background image. To help you gain confidence in changing the background image I have provided some sample images for you to practise with. Also in this Blogger tutorial you have learned how to change the color of your Blogger background if you prefer a plain solid background color rather than a background image. As always if you strike any problems implementing the tips in this tutorial please let me know.
Related Articles
List of Blog Know How Tutorials for Blogger Blogs
How to Add, Delete or Remove Blogger Image Borders
How to Align and Justify Posts in Blogger
How to Add a Divider Between Blogger Posts
I have chosen to write this article not because there aren't any how to articles already on the net but because they assume quite a bit of knowledge. I have taken a different tack with this post in that I assume you are an absolute beginner with no knowledge of Blogger templates.
For this reason I have provided some sample backgrounds for you to play around with. By just cutting and pasting these images you can see first hand how dramatically adding a different background to your Blogger template can change it. You will see that replacing your background image with these images isn't that difficult and hopefully it will give the confidence to branch out further and change the background of your Blogger template to suit your own needs. All that is needed is to insert a small snippet of code into the CSS styling section of your Blogger template and hey presto your Blogger template will take on a whole new look.
How to Change the Color of a Blogger Background (Default Templates)
If you are using a default Blogger template then you already have the option to change the background color to your own taste by going to Layout > Fonts and Colors. Some third party custom Blogger templates have this option too but by no means all. For instructions on changing the background color of custom templates see tips and troubleshooting below.
How to Add a Background Image to a Blogger Template
- Log in to Blogger if not already logged in
- Go to Layout > Edit HTML
- Back up your Blogger template as a precaution by downloading the full template to your computer
- Find the following line in your Blogger template
body {
- Add the following line directly after this line
background-image: url(URL address of your image);
Your block of code will now look like this:body {
background-image: url(URL address of your image);
(existing code in this block)
} - Now replace the code in red for the URL address of your image. Choose an image from the selection below to practise with or use your own image. Note if using your own image make sure you read the tips and troubleshooting section below.

https://blogger.googleusercontent.com/img/b/R29vZ2xl/AVvXsEjEi07rn-s5v8HTn5HfPfF8SSw0dtFOgMOTPQNBgSuE-UFbv3cAuNwiSEy_hP46EnxZr-AhJFpaLUc2PJjoB3rAYl4CkzD_Ftsybqz2Gg-JjOTtmpiL5K_wl0xvaKxUFwKV1jA7O8S6zig/s320/background_047.gif
https://blogger.googleusercontent.com/img/b/R29vZ2xl/AVvXsEgVROrCzULT7EdOUUJLHWfpGPR8NMl7YT-zp_oTEVa7CieqwHFucvsYH_RjjM7JZO3dyLjOhMUH_dpeSJtDVZU_RjcdP1nYfiCOdrwZ9t0IsddRng2JSt0d2WMC4vMOEDxafTa71qDfJqY/s320/background_104.gif
https://blogger.googleusercontent.com/img/b/R29vZ2xl/AVvXsEj148ZxIXhdEj0b8i8yzEuyP8TDQwgQkXc3uYGwj0BDApmz1TXMUrwVgVLsnD_z5egg_yk6lhswBc2hfGz0Q5KvUSX_KbEXNXNpqFSl_Iw-a9BCDOCRB-y92fRcKmrf7KOI1i7oksWSG-k/s320/background_126.gif
https://blogger.googleusercontent.com/img/b/R29vZ2xl/AVvXsEhvPifjEaaZHCfgURgJi1C4l5QJg8O0YI4DlSozGclL1KuoCgr5FSdelfW5hy0A4GHMzWLOATLYlQtkN9LZ0UAGNjHQY3jtAdcVZI5GN1XjkC0m5zrbrv-IJR2PlObnNaeN3hfsUW9z36U/s320/background_073.gif
https://blogger.googleusercontent.com/img/b/R29vZ2xl/AVvXsEhOf0BmCj3nG2dFILV02yH1lIre1-JtF7xRLlT-Shr-GZv2PGOZbrizi6z3L1wIvttAu1lv0FgIvthJqmKYhlHC0kDE-zy-f2EmmOhJENe9Aqd6KqeePIiQT0fEJueWF9r3EdFBU94uvGM/s320/background_083.gif
Green Paws Background
https://blogger.googleusercontent.com/img/b/R29vZ2xl/AVvXsEgKKks5v7wW6a6gUtUElkZHk9r0-76mZOhkLg1fNpdxtcj54AQoDoIlFc90si_kBg4llUxLkzOUOHH0nfgSHweX4w2Bv5tntWidRBIeJQ7JOhZ2Mjx39qm6yyuVez9Elhp7ErMPZJFAUFU/s320/green-paws.gif
Musical Notes Background
https://blogger.googleusercontent.com/img/b/R29vZ2xl/AVvXsEia_e2Uez_IUrOFlA6r_PAajrqtTo2MGgVpbysSUIMOnHupPdaRF3UtX41xbH2kEqKkr8GRoRUXntRcdvdMYoBUIiQnzd_9S8Yr7-xnesl6GK-tymAz-Q76mzy5jUwBbJ2UyCgxOJe2O4g/s320/melody.gif - Use the Preview button to see the effect of these different backgrounds on your template. It will help you get an idea of the kind of possibilities out there.
- You are welcome to use one of the above Blogger backgrounds as they are all free to use without any restriction. If you decide to use one of these simply click on Save Template and you are in business. Alternatively go ahead and find your own background image on the net and follow the instructions below to insert it into your Blogger template.
Tips and Troubleshooting
- To Add Your Own Image to a Blogger Template
There are huge number of backgrounds on the net that are suitable for Blogger. Search under free website backgrounds in your favorite search engine to find these.
Simply download your preferred background and save to an image service like Photobucket, Flickr.
Make sure the file format is either a .jpg, .gif or .png and that its size does not exceed 100kbs. As a rule of thumb an image size of around 30kb or less is about right if loading time speed is not to be compromised. Larger images can be resized quickly by using an online resizing service such as Shrink Pictures.
Follow the instructions above to change the URL to that of your image. - To Change the Background Color of Your Custom Blogger Template
If there is no option to change the background color of your Blogger template in Layout > Fonts and Colors you can still change the color manually.- Follow steps 1 to 4 as above
- Find the line beginning with :
background-color: #
- The hex color will be different for each template. We will change the color only
background-color: #change hex color code to your chosen color;
- Replace the existing hex color code with the value of your chosen hex color. List of web safe hex colors. For example insert the following code to change the background color to:
Denim Bluebackground-color: #336699;
Blackbackground-color: #000000;
Whitebackground-color: #ffffff;
- Use the Preview button to see the effect of each color before you save it.
- Once you are satisfied go ahead and click on Save Template
- Follow steps 1 to 4 as above
Today's Blogger tutorial (Blogspot tutorial) aimed at Blogger beginners continues the series on CSS styling for Blogger. You have learned how to add the background image to your Blogger template or change the existing background image. To help you gain confidence in changing the background image I have provided some sample images for you to practise with. Also in this Blogger tutorial you have learned how to change the color of your Blogger background if you prefer a plain solid background color rather than a background image. As always if you strike any problems implementing the tips in this tutorial please let me know.
Related Articles
List of Blog Know How Tutorials for Blogger Blogs
How to Add, Delete or Remove Blogger Image Borders
How to Align and Justify Posts in Blogger
How to Add a Divider Between Blogger Posts
Minggu, 25 Oktober 2009
November "On The House" Cover Photo Contest
Send us your favorite fall photo and win a Ranch House Designs cap! We are asking our friends and clients to choose their favorite fall photo or Thanksgiving photo to be used on our November cover of "On the House", the online magazine for Ranch House Designs.
Photos can be sent to rachel@ranchhousedesigns.com by October 28th. The winner will be announced on November 3rd when the new magazine will be published online.
Also just a reminder to our clients, if you have an ad to send in for the magazine, please send it to liz@ranchhousedesigns.com by October 28th. All ads designed by RHD are automatically included in the publication but any of our web site clients are also able to submit their ads for the publication too!
Jumat, 23 Oktober 2009
Fan Pages on Facebook

Now, there are tons of ranch-related and livestock-related Fan Pages on Facebook. It seems like every time I log in I get a suggestion of becomming a fan of some other ag-related business.
So if you're on Facebook, you might want to consider starting a fan page for your business. It's really simple, it's free, and it's another great way of using a social network tool to help promote your brand. The easiest way to start your own business' fan page is to go to another fan page, like the V8 Ranch one, and then scroll down to the bottom of the page and look on the left hand column for a link that says "Create A Page for My Business."
If you are a RHD client, we can easily provide you with graphics to go on your fan page, such as a Facebook sized logo or other options for you to post. One thing we do caution clients about is that you would want to consider what photos or graphics you post on facebook, because of copyright restrictions. By agreeing to the Facebook terms of service you release any copyright on any photo you upload to their site. So if you upload your photos or logo, just be aware that you are releasing fb to use it if they want.
If you're new on facebook, please add Ranch House Designs to your list of fan pages. Also all of the RHD staff is on facebook, so search for your favorite designer and add us as friends. Here are also some other Fan pages of RHD clients....
Rabu, 21 Oktober 2009
Louisville Display Banners
With Louisville just a month away, now is the time to order your display banners for the North American! We can do banners of all sizes, but the most popular are the 4x4 square banners and the 4x8 long display banners. Whether you have a new sire to promote, or just need a banner for your farm to put at your stalls, we can design a banner for you that will get you noticed and fit your budget! Call 979-532-9141 to order or e-mail tricia@ranchhousedesigns.com to get started.
Denver bull banners will be due December 10th for standard orders. For the past few years, the RHD banners have been the favorites in the yards. If you have a bull to promote, you need RHD to do your banner. So be thinking about that and we'll be looking forward to hearing from you!
Denver bull banners will be due December 10th for standard orders. For the past few years, the RHD banners have been the favorites in the yards. If you have a bull to promote, you need RHD to do your banner. So be thinking about that and we'll be looking forward to hearing from you!
Sabtu, 17 Oktober 2009
Upgrades to Maximum Exposure Video Service
After working with Maximum Exposure Photography for several years now, we were very pleased a few weeks ago when we got their videos to post on Jeff Miller's web site. Maximum Exposure has upgraded their technology and now offers video hosting to those people who use their service, which is much better for clients.
By Maximum Exposure hosting the videos, it saves clients money in web hosting expenses, and offers a standardized video player which should help in accessibility of the videos.
Kudos to Mark and the rest of the Maximum Exposure team on this upgraded service!
By Maximum Exposure hosting the videos, it saves clients money in web hosting expenses, and offers a standardized video player which should help in accessibility of the videos.
Kudos to Mark and the rest of the Maximum Exposure team on this upgraded service!
Jumat, 16 Oktober 2009
Add a Post Divider Between Blogger Posts
In today's Blogger tutorial I show you how to enhance your Blogger blog (Blogspot blog) by adding a post divider to your Blogger template. Used effectively post dividers can really jazz up your blog and will lend it that individual feel which most of us are hoping to create.
This tweak is very easy and well within the capabilities of any Blogspot blogger. Only a few simple changes to your Blogger template are required and these are in the CSS styling section.
By way of example I will use a divider that I downloaded from the internet free by searching for free divider graphics. Here are some sample dividers you can use to get started:

URL address:
https://blogger.googleusercontent.com/img/b/R29vZ2xl/AVvXsEjkHTcKt9CVwoKH14_WzwQyixVRe8dVkJgIySxIIgiVORD2v9J8qlle21leqyFCNjvnlbKiWja2yhxQT69l_8b900mpAhmjmjSxkNTWQbMM2rMK6VSsx4A2rxBdgxzX-AgrnDpVkMlkHtY/s400/ribbon.gif

URL address:
https://blogger.googleusercontent.com/img/b/R29vZ2xl/AVvXsEhl5aY9AvOa2ojmAgQNQ_eociLfSpzcKKNTDsymjOTWTfWGtySoBbpimDGAQNMirJ5F1kxiSnHshiqLsJfK11C0bXIgwaoVCK224RzgNr1zkW9wwV1yDz5QiX7mVgKFV6qIZxhB9MIFLfg/s400/bar1.gif

URL address:
https://blogger.googleusercontent.com/img/b/R29vZ2xl/AVvXsEg1zVa7ejKACEy1ZNLA8VvlYPMsu_-uFs_HE-EGccnChruryH8YTfZcw5595efh2V2YQcbYKyMgjB9QvVyLaIUo0HTZ3ximEuSzOoqNU1ZTdJGhiLF19YVFTPDujumXRK9lhcosNRhlXso/s400/barbsmpl.jpg

URL address:
https://blogger.googleusercontent.com/img/b/R29vZ2xl/AVvXsEjCkle45VeYgLMvmtxNApz_MLeVq88MP663EZoV44MaOGe1yY2UOO9P-Mqhmbk_mDKDvAT8SiogU3aTs7PEBkH5QbQNWrwzkoPZJr1L0UXWS-jHByMs4LkCnCxR_x5Vas2-wrF9ftfA-hg/s400/bar47.gif
How to Add a Divider Between Posts in Blogger
Tips and Troubleshooting
In today's Blogger tutorial you have learned how to insert a divider between your Blogger posts to enhance the look of your Blogger template (Blogspot template). You can either make your own post divider or download one from the myriad of free website dividers available on the net.
Related Articles
List of Blog Know How Tutorials for Blogger Blogs
How to Add, Delete or Remove Blogger Image Borders
How to Align and Justify Posts in Blogger
This tweak is very easy and well within the capabilities of any Blogspot blogger. Only a few simple changes to your Blogger template are required and these are in the CSS styling section.

By way of example I will use a divider that I downloaded from the internet free by searching for free divider graphics. Here are some sample dividers you can use to get started:

URL address:
https://blogger.googleusercontent.com/img/b/R29vZ2xl/AVvXsEjkHTcKt9CVwoKH14_WzwQyixVRe8dVkJgIySxIIgiVORD2v9J8qlle21leqyFCNjvnlbKiWja2yhxQT69l_8b900mpAhmjmjSxkNTWQbMM2rMK6VSsx4A2rxBdgxzX-AgrnDpVkMlkHtY/s400/ribbon.gif

URL address:
https://blogger.googleusercontent.com/img/b/R29vZ2xl/AVvXsEhl5aY9AvOa2ojmAgQNQ_eociLfSpzcKKNTDsymjOTWTfWGtySoBbpimDGAQNMirJ5F1kxiSnHshiqLsJfK11C0bXIgwaoVCK224RzgNr1zkW9wwV1yDz5QiX7mVgKFV6qIZxhB9MIFLfg/s400/bar1.gif

URL address:
https://blogger.googleusercontent.com/img/b/R29vZ2xl/AVvXsEg1zVa7ejKACEy1ZNLA8VvlYPMsu_-uFs_HE-EGccnChruryH8YTfZcw5595efh2V2YQcbYKyMgjB9QvVyLaIUo0HTZ3ximEuSzOoqNU1ZTdJGhiLF19YVFTPDujumXRK9lhcosNRhlXso/s400/barbsmpl.jpg

URL address:
https://blogger.googleusercontent.com/img/b/R29vZ2xl/AVvXsEjCkle45VeYgLMvmtxNApz_MLeVq88MP663EZoV44MaOGe1yY2UOO9P-Mqhmbk_mDKDvAT8SiogU3aTs7PEBkH5QbQNWrwzkoPZJr1L0UXWS-jHByMs4LkCnCxR_x5Vas2-wrF9ftfA-hg/s400/bar47.gif
How to Add a Divider Between Posts in Blogger
- Login to Blogger if not already logged in
- From the Dashboard navigate to Layout > Edit HTML
- Back up your Blogger template as a precaution by downloading it to your computer
- Find the following line of code in your template:
.post {
You are likely to have something like this in your template already:
.post {
margin:.5em 0 1.5em;
border-bottom:1px dotted $bordercolor;
padding-bottom:1.5em;
} - Paste the following lines of code to this block making sure you paste them before the closing curly bracket:
background: url(https://blogger.googleusercontent.com/img/b/R29vZ2xl/AVvXsEjkHTcKt9CVwoKH14_WzwQyixVRe8dVkJgIySxIIgiVORD2v9J8qlle21leqyFCNjvnlbKiWja2yhxQT69l_8b900mpAhmjmjSxkNTWQbMM2rMK6VSsx4A2rxBdgxzX-AgrnDpVkMlkHtY/s400/ribbon.gif);
background-repeat: no-repeat;
background-position: bottom center;
margin:.5em 0 1.5em;
padding-bottom:1.5em; - If any lines are duplicated remove them.
- Remove any line beginning with: border-bottom: eg
border-bottom:1px dotted $bordercolor;
- You will now have a block of code which looks like this plus any extra lines from the existing code in this block:
.post {
background: url(https://blogger.googleusercontent.com/img/b/R29vZ2xl/AVvXsEjkHTcKt9CVwoKH14_WzwQyixVRe8dVkJgIySxIIgiVORD2v9J8qlle21leqyFCNjvnlbKiWja2yhxQT69l_8b900mpAhmjmjSxkNTWQbMM2rMK6VSsx4A2rxBdgxzX-AgrnDpVkMlkHtY/s400/ribbon.gif);
background-repeat: no-repeat;
background-position: bottom center;
margin:.5em 0 1.5em;
padding-bottom:1.5em;
} - Click on Save Template to save your changes
- Click on View Blog to see your new post divider between posts
Tips and Troubleshooting
- To change the divider to one of the above replace the URL address of the image (in red) with the URL address of the new image you want to use.
- To use your own divider image download to your computer from the internet and then save the image to a photo image service like Photobucket. Replace the divider image URL address (in red) with the URL address of your new image
- To increase the padding around the divider change the following line of code:
padding-bottom:1.5em;
to
padding-bottom:2.5em;
In today's Blogger tutorial you have learned how to insert a divider between your Blogger posts to enhance the look of your Blogger template (Blogspot template). You can either make your own post divider or download one from the myriad of free website dividers available on the net.
Related Articles
List of Blog Know How Tutorials for Blogger Blogs
How to Add, Delete or Remove Blogger Image Borders
How to Align and Justify Posts in Blogger
Kamis, 15 Oktober 2009
Boneso Livestock

So now we are very happy to launch the new web site for Boneso Livestock, which is owned and operated by Steve, Mary Ann, Wes and Maggie. The Boneso family is from San Miguel, California.
They will be hosting a private treaty sale on October 17 at their farm in San Miguel, California. This sale will feature a select group out of donor cows hand-picked for the Boneso's by Blaine Rodgers and Nick Reimann. After very successful show careers, the cows went into production at their farm and raised top show prospects that will be sold at the sale.
You'll also recognize the Walks on Water sire, who was a display bull in Denver 2009. This is a Heat Wave son.
So we hope you will visit http://www.bonesolivestock.com/ and check out the sale information and donors in this great west-coast program.
Selasa, 13 Oktober 2009
Working Ranch Magazine

A few weeks ago I was sitting at Catalena Hatters in Bryan, Texas while Brandon was getting his new cowboy hat shaped. I saw this magazine sitting on the bench in their store so I picked it up and started browsing through it. LOVE IT! This is a great magazine for anyone in the cattle business.
A relatively new publication, Working Ranch is what I would consider similar to a Sports Illustrated, Cosmo, or Cowboys & Indians type magazine for ranchers and those who love the cattle business. It's very trendy, has great articles, and really relates to those who are living the ranch lifestyle day in and day out.
The great thing about this magazine is that it is free! That's right, you can get a free subscription if you visit their web site at http://www.workingranchtv.com/.
Their next issue that will be arriving is the November/December magazine, so you might want to go ahead and subscribe so that you'll be on the mailing list for that issue.
And, for our advertising clients, this is a great publication to consider advertising in. Their rates are very affordable and they have a great circulation. If you're a livestock person wanting to advertise the person to talk to is Todd McCartney and his e-mail is todd@workingranchmag.com. This is a great outlet for advertising bull sales and other registered cattle events.
Enjoy reading!
Minggu, 11 Oktober 2009
St. Paul Lutheran Church of Wharton

boldly teach, preach, and live the love of Christ." - St. Paul Lutheran Church of Wharton
What beautiful words from a great group of people! This month we were very happy to create a web site for St. Paul Lutheran Church, one of our community's churches. With a very rich and deep tradition in Wharton County, this congregation celebrated their 110th anniversary in 2005.
At RHD, we love to work with churches to help share the good news of God's love with others. Because of this, we offer special discounts and even in some cases pro-bono work to faith-based organizations. This month, we created the new web site for St. Paul Lutheran, we designed flyers for the Abell Street Church of Christ gospel meeting, and we have other church web sites in the works.
We encourage you to visit http://www.stpaulwharton.org/. If your church or association needs help with your church web site or church promotional materials, we're glad to help.
Add a Twitter Profile Widget to Blogger
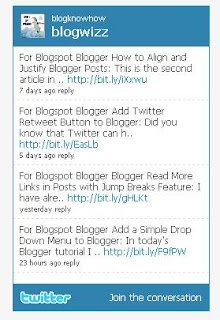
If you use Twitter then you are going to want to let your Blogger readers know about it. One effective way to show your Twitter updates on Blogger is to add a Twitter profile widget to the sidebar of your blog. This widget is quite a bit more fancy than the current Twitter Updates Widget available through Blogger which I showed you how to insert into your blog in my recent article Add a Twitter Updates Widget to Blogger. On the minus side the widget may slow your blog down so test it out first if fast loading time is crucial to you.
How to Insert a Twitter Profile Widget into Blogger
In this Blogger tutorial I have showed you how to add a Twitter Profile Widget to the sidebar of your Blogger blog (Blogspot blog). This Twitter widget will encourage your blog readers to visit your Twitter Profile and with luck you may get some new Twitter followers out of it.
Related Articles
List of Blog Know How Tutorials for Blogger Blogs
Add a Twitter Updates Widget to Blogger
Add Twitter Button or Twitter Badge to Blogger
Add Twitter Followers Counter to Blogger
Add a Social Bookmarking Button to Blogger
Add Social Bookmark Buttons to Blogger
Best Free Social Bookmark Icon Sets for Blogger

How to Insert a Twitter Profile Widget into Blogger
- Go to Twitter Widgets and sign in

- Choose Profile Widget and you will be taken to a default profile widget page where you can customize your Twitter widget according to your needs.
- Choose Settings and make sure that your username is correct
- Choose Appearance and make any custom color changes you need to so that the widget will blend into your blog. At the very least you will need to change the shell background and the links colors to suit your blog
- Choose Dimensions and change the sizing of the widget if it is too large to fit into your Blogger sidebar. The default setting is 250x300
- Click on Test Your Settings to ensure your new widget looks the way you want it to
- Click the Finish and Grab Code button
- Copy the code by right click the mouse in the code box and choosing Select All. Right click again and choose Copy
- Sign in to Blogger. From the Dashboard go to Layout | Page Elements
- In the sidebar choose Add a Gadget and then a HTML/Javascript widget
- Paste the Twitter code into the gadget content box and click Save
- Your Twitter Profile Widget will now be showing in your Blogger sidebar so click on View Blog to admire it

In this Blogger tutorial I have showed you how to add a Twitter Profile Widget to the sidebar of your Blogger blog (Blogspot blog). This Twitter widget will encourage your blog readers to visit your Twitter Profile and with luck you may get some new Twitter followers out of it.
Related Articles
List of Blog Know How Tutorials for Blogger Blogs
Add a Twitter Updates Widget to Blogger
Add Twitter Button or Twitter Badge to Blogger
Add Twitter Followers Counter to Blogger
Add a Social Bookmarking Button to Blogger
Add Social Bookmark Buttons to Blogger
Best Free Social Bookmark Icon Sets for Blogger
Sabtu, 10 Oktober 2009
New Web Site - Top Line Angus

Top Line Farms is located in Central Illinois about 15 miles south of Peoria. They are registered Angus breeders who strive to produce eye appealing cattle that will compete at any level while maintaining maternal strengths that make great cows. Their cattle will function in any climate and be versatile enough for all parts of the country.
The folks at Top Line have put together a great set of donors both raised on the farm and a few purchased from leading Angus operations. Their first production sale will be October 24th in Tremont, IL and a great sale preview of the offering is pictured on their Sales Page.
We hope you will visit this web site where you'll be very impressed with their Angus genetics!
Add a Simple Drop Down Menu to Blogger
In today's Blogger tutorial I show you how to add a simple drop down menu widget sometimes called a select box to the sidebar of your Blogger blog (Blogspot blog). If you want to add lots of links to your Blogger blog but are worried about the amount of space this will take up on your blog this tutorial is for you. A drop down widget is a neat solution to the cluttered sidebar problem as it is both space saving and easy to install. The convenience of a drop down menu widget can be seen on many blogs where it is used for lists like a long Blogroll, Categories list, Labels list or a Recommended Posts list.
How to Add a Drop Down Menu Widget to Blogger
Adding a drop down menu to Blogger is well within the capabilities of even beginner bloggers. Most of the work is in cutting and pasting the links which is not difficult for anyone with basic computer skills. So let's get started but first here is a working drop down menu list with links to various posts in my blog:
In today's Blogger tutorial I have provided you with instructions to create and insert a simple drop down menu widget in the sidebar of your Blogger blog (Blogspot blog). This widget is ideal for reducing clutter on your Blogger sidebar and excellent for displaying long lists of links such as labels in a convenient, neat and space saving way. A drop down menu gadget is easily installed from the Layout > Page Elements page and can be customized to your own specifications. Any problems with this Blogger tweak please let me know. Enjoy!
Related Articles
List of Blog Know How Tutorials for Blogger Blogs
Add Breadcrumb Navigation to Blogger
Add Horizontal Links Menu Navigation to Blogger
How to Add a Drop Down Menu Widget to Blogger
Adding a drop down menu to Blogger is well within the capabilities of even beginner bloggers. Most of the work is in cutting and pasting the links which is not difficult for anyone with basic computer skills. So let's get started but first here is a working drop down menu list with links to various posts in my blog:
- Log in to Blogger if not already logged in
- Navigate from the Dashboard to Layout > Page Elements.
- Click on Add a Gadget in the sidebar or other location if you wish
- Select a HTML/JavaScript gadget from the list of gadgets
- Paste the following code into the content box of the widget:
<form><select name="menu" onchange="window.open(this.options[this.selectedIndex].value,'_blank')"
size=1 name=menu>
<option>- Your Menu Title -</option>
<!-- Change the following links to your own -->
<option value="http://URL of link1">Link 1</option>
<option value="http://URL of link2">Link 2</option>
<option value="http://URL of link3">Link 3</option>
<option value="http://URL of link4">Link 4</option>
<option value="http://URL of link5">Link 5</option>
<option value="http://blogknowhow.blogspot.com">Blog Know How</option>
</select></form> - Replace _blank as follows:
- To have a new window open leave the same
- To have the new page appear in the same window replace _self
- To have a new window open leave the same
- Replace - Your Menu Title - with a title of your own
- For each instance of the option values highlighted in red substitute your own links and link names. For example:
<option value="http://blogknowhow.blogspot.com">Blog Know How</option> - Click Save
- Use drag and drop to position the drop down menu widget in the location you want it within your sidebar and save any changes
- Click View Blog to admire the new drop down menu in the sidebar of your blog
In today's Blogger tutorial I have provided you with instructions to create and insert a simple drop down menu widget in the sidebar of your Blogger blog (Blogspot blog). This widget is ideal for reducing clutter on your Blogger sidebar and excellent for displaying long lists of links such as labels in a convenient, neat and space saving way. A drop down menu gadget is easily installed from the Layout > Page Elements page and can be customized to your own specifications. Any problems with this Blogger tweak please let me know. Enjoy!
Related Articles
List of Blog Know How Tutorials for Blogger Blogs
Add Breadcrumb Navigation to Blogger
Add Horizontal Links Menu Navigation to Blogger
Jumat, 09 Oktober 2009
Blogger Read More Links in Posts with Jump Breaks Feature
In this Blogger tutorial you will learn how to insert jump breaks into your Blogger posts (Blogspot posts) as an aid to quick navigation for your visitors. Jump Breaks in Blogger provide an easy way to show only a snippet of your whole post on the home page of your blog with a read more link below it for the rest of the story.
I have already written about a Blogger expandable post summaries hack which provides a read more feature for a Blogger blog homepage. For most Blogger webpublishers (Blogspot webpublishers) this hack is no longer necessary because Blogger as part of its 10th birthday celebration introduced a new feature called Jump Breaks. I cover several methods to insert jump breaks depending on whether you are using a Blogger default template or a customized Blogger template.
The advantage of adding jump breaks to your Blogger posts is that your readers can quickly and easily skim your most recent posts for what interests them rather than having to scroll through a whole bunch of long articles. This is definitely a big help for those of us like me who often write articles longer than 500 words. If your posts are short and sweet you may find that adding this read more feature is unnecessary however you can still apply it when you do have a longer post. Below is an example post which illustrates the Jump Break feature in action.
How to Insert Jump Breaks (Read More Links) in Blogger
It is easy to insert a Jump Break into your Blogger posts (Blogspot posts) at any point of your choosing.
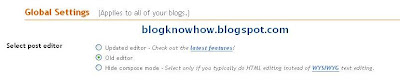
There are two methods of inserting the Jump Breaks in Blogger. Which method you choose depends on which post editor you are using. If you are not sure which editor you are using check this out by going to Settings > Basic and scrolling to the bottom of the page. Under Global Settings you will see a radio button next to old editor or updated editor.
Tips and Troubleshooting
In this tutorial you have learned how to create expandable post summaries using the new Blogger feature Jump Breaks. You now have the option to easily insert Jump Breaks into your Blogger posts so that longer posts appear with only an introduction followed by a Read More link.
I have shown you 2 methods to insert the Jump Breaks and Read More links into your Blogger posts depending on whether you are using the new or old post editor features. I have also given you some tips to make sure you get the most out of the Blogger Jump Break feature including what to do if the Jump Breaks feature does not work with your customized Blogger template. As always I would welcome your feedback about your experiences with the expandable post summaries Blogger feature (Blogspot feature) or any other feature you may be having an issue with.
Related Articles
List of Blog Know How Tutorials for Blogger Blogs
Blogger Buzz - You Might as well Jump!
I have already written about a Blogger expandable post summaries hack which provides a read more feature for a Blogger blog homepage. For most Blogger webpublishers (Blogspot webpublishers) this hack is no longer necessary because Blogger as part of its 10th birthday celebration introduced a new feature called Jump Breaks. I cover several methods to insert jump breaks depending on whether you are using a Blogger default template or a customized Blogger template.
The advantage of adding jump breaks to your Blogger posts is that your readers can quickly and easily skim your most recent posts for what interests them rather than having to scroll through a whole bunch of long articles. This is definitely a big help for those of us like me who often write articles longer than 500 words. If your posts are short and sweet you may find that adding this read more feature is unnecessary however you can still apply it when you do have a longer post. Below is an example post which illustrates the Jump Break feature in action.

How to Insert Jump Breaks (Read More Links) in Blogger
It is easy to insert a Jump Break into your Blogger posts (Blogspot posts) at any point of your choosing.
There are two methods of inserting the Jump Breaks in Blogger. Which method you choose depends on which post editor you are using. If you are not sure which editor you are using check this out by going to Settings > Basic and scrolling to the bottom of the page. Under Global Settings you will see a radio button next to old editor or updated editor.

- Method 1
Insert Jump Breaks - New Blogger Post Editor Only
In order to use this method you need to be using the updated editor in Blogger or have Blogger in Draft enabled.- When creating a new post in the Blogger Post Editor position the cursor in the editor at the point you wish the Jump Break to be inserted
- Click on the insert Jump Break icon (currently the last option on the menu)

- A jagged dividing line will appear to mark the insertion point
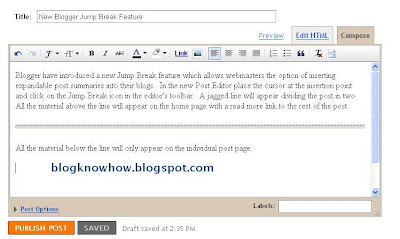
- Publish your post as normal
- When creating a new post in the Blogger Post Editor position the cursor in the editor at the point you wish the Jump Break to be inserted
- Method 2
Insert Jump Breaks - Old Blogger Post Editor Only
If you are using the old post editor rather than the new post editor you can still insert jump breaks into your Blogger posts.- When creating a new post in the Blogger Post Editor make sure you are in the Edit HTML mode rather than compose mode
- Insert the following code at the point where you want to break the Jump Break to occur:
<!-- more -->
- Publish post as normal
- When creating a new post in the Blogger Post Editor make sure you are in the Edit HTML mode rather than compose mode


Tips and Troubleshooting
- To Add Jump Breaks to New Posts Automatically
To save time it is possible to automatically add Jump Breaks to posts with the following method:- Go to Settings > Formatting and scroll to the bottom of the page
- Under Post Template paste <!-- more --> into the box and save. The next time you create a new post the <!-- more --> will automatically appear. Make sure you are in the Edit HTML mode to see <!-- more --> appear.

- Go to Settings > Formatting and scroll to the bottom of the page
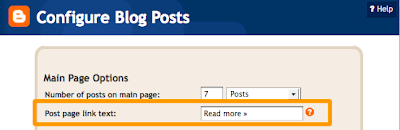
- To Change the Read More Text
If you want to change the Read More text for something like Read Full Story or Continue Reading you can easily do this by:- Go to Design > Page Elements
- Edit the Blog Posts widget
- Change the post page link text (Read More text) which appears at the top of the page to your preferred text and save
- Go to Design > Page Elements
- To Manually Add Jump Breaks to Blogger For Users of Customized Templates
If you are using highly a customized template or have customized your Blog Posts widget you may experience a problem in getting the Blogger Jump Break feature to work. In this event you can edit your Blogger template to enable Jump Breaks.- As a precaution back up your template by downloading full template to your own computer
- Tick the Expand Widget Templates checkbox
- Using CTRL + F find the following line of code:
<data:post.body/>
- Directly below this line insert the following code into your Blogger template:
<b:if cond='data:post.hasJumpLink'>
<div class='jump-link'>
<a expr:href='data:post.url + "#more"'><data:post.jumpText/></a>
</div>
</b:if>
- As a precaution back up your template by downloading full template to your own computer


In this tutorial you have learned how to create expandable post summaries using the new Blogger feature Jump Breaks. You now have the option to easily insert Jump Breaks into your Blogger posts so that longer posts appear with only an introduction followed by a Read More link.
I have shown you 2 methods to insert the Jump Breaks and Read More links into your Blogger posts depending on whether you are using the new or old post editor features. I have also given you some tips to make sure you get the most out of the Blogger Jump Break feature including what to do if the Jump Breaks feature does not work with your customized Blogger template. As always I would welcome your feedback about your experiences with the expandable post summaries Blogger feature (Blogspot feature) or any other feature you may be having an issue with.
Related Articles
List of Blog Know How Tutorials for Blogger Blogs
Blogger Buzz - You Might as well Jump!
Mock Livestock
If you're looking for heavy muscled, good ribbed, structurally correct wethers with a killer look -- there is one place to go --- Mock Livestock!

We are happy to introduce our newest show goat web site at RHD -- Mock Livestock. ML is owned by two great young people in this business - Kevin and Megan Mock of Blanco, Texas.
The Mock Family, who will be growing very soon with the birth of their twins, are two very busy go-getters who have made quite a name in the show goat business.
Mock Livestock consist of around 150 show wether oriented embryo recip does and a small herd of elite embryo donors. Their program is built around predictable, line-bred pedigrees that are proven to produce champion show wethers. Such genetic lines include “900”, Schafer, Kohls, and Powell-Holman.
We have worked with Kevin for about two years now on a variety of projects before officially launching the newly-redesigned Mock Livestock site. Kevin is also a part of the Duelm's Prevailing Genetics team and a goat speecialist for Show-Rite feeds as well as a trailer designer for Sundowner Trailers.
We hope you will take a minute to visit their new web site and remember Mock Livestock whenever you need a killer show goat or show pig.
Kamis, 08 Oktober 2009
September Web Updates Blowout
As to be expected with all of the busy club calf sales during the month of September, RHD recorded our biggest web updating month in the 10-year-history of RHD in September 2009!! This month we did a record-number 333 updates from September 1-30!!!
Recently I was visiting with someone who has a web site done by a company other than RHD. This person was complaining that they had sent in some photos to be added to their web site and 5 days had passed, and the photos still weren't added. Their sale was coming up, and they wanted their photos up right away. Wouldn't that be FRUSTRATING!
At RHD, we know that time is money. That's why we make it a top priority to keep our clients web sites updated as soon as possible. Of the 333 updates we did this month, 271 of these were done on the VERY SAME DAY the client requested the update. The remaining updates were done within 1 day of the client update request.
So yeah, we're tooting our own horn a little bit, but we feel this is important.
Our Grand Champion Updater for September 2009 was Beefmaster Breeders United. This is a great group of people to work with. By and large, their updates are due to the very popular Buy/Sell listing on their web site which is a great service to BBU members. They had twice as many updates as any other client.
Our Reserve Champion Updater for Sepember 2009 was the American Brahman Breeders Association.
Other sites in the final drive for this month's updating championships were:
Rabu, 07 Oktober 2009
RHD's On The House Online Magazine

How can you get your ad in this magazine? Simple, be a RHD client.
If we do your print ad, we'll automatically include your ad in this publication for as many times as you want. For example, if we design a bull ad for you, if you want us to include it in every online issue for the entire year, just let us know. If you have a sale ad, we'll include it in every month publication until your sale happens.
If you have a magazine or someone else do your print ad, but RHD does your web site, we'll still include your ad free of charge. All you have to do is get your final, camera ready ad to us by the 20th of the month to be included.
How much does it cost? It's free to all RHD clients!
So we invite you to check out this month's "On the House" by visiting Ranch House Designs. The magazine is posted on our home page. We welcome your feedback and ideas! This month's cover features our good friend and RHD client Travis Pembrook judging at the South Dakota State Fair, taken by Lacee Caffee of LC Promotions. If you have a cover shot you'd like to submit, e-mail it to rachel@ranchhousedesigns.com
Selasa, 06 Oktober 2009
RHD Speaking at San Antonio Farm and Ranch Expo
 This Thursday night, I've got plans to be enjoying a nice Mexican dinner and margarita at Casa Rio on the San Antonio Riverwalk!
 Why? Because on Friday, I was invited to be a speaker at the San Antonio International Farm and Ranch Expo at the San Antonio Livestock Show.
This is the 1st Annual expo, hosted by Texas AgriLife Extension, Texas Farm Bureau, Texas Department of Agriculture, and the San Antonio Convention Bureau. It will be held at the stock show, (San Antonio Livestock Exposition) and is free to attend.
The conference runs from October 8-10 (Thursday-Saturday) but I will be speaking twice on Friday. My first appearance will be at 10:00 a.m. on Friday as part of the "Spouse's" program, then later in the day at 2:00 p.m.
So if you're a south Texan, stop by the Expo and come listen to my talks. And even if you're not interested in my talks on web design and advertising, there are over 50 different educational programs and a big trade show, also free to attend.
Senin, 05 Oktober 2009
Bonnell Club Calves

Visit http://www.bonnellclubcalves.com/
Add Twitter Retweet Button to Blogger
Did you know that Twitter can help drive traffic to your Blogspot blog? In today's Blogger tutorial I show you how to add a free Twitter Retweet button to your Blogger posts. Adding a Tweetmeme Twitter Retweet button to Blogger will help promote your blog on Twitter in 2 ways: one by attracting new Twitter followers and two by increasing the direct traffic to your blog from Twitter.
What is Twitter and How Does it Work?
Twitter is currently the fastest growing free social networking site. Essentially, Twitter users micro blog about what they are doing or what others are doing by posting tweets of around 140 characters to Twitter. When Twitter members read these tweets and like what they read they can become followers much in the same way that your readers can choose to follow your blog.
Twitter is great news for bloggers because it can be used as a vehicle to promote blogs. Blogger can easily be linked with Twitter services so that every time a post is made to Blogger a short message with a link is posted on Twitter. As every follower is notified that you have tweeted, a blog publisher can gain lots of exposure for their blog with very little effort.
Once you add Tweetmeme retweets to the mix the spread compounds because not only do you have followers hearing about your tweet but the followers of followers. So say one of your followers retweets your post all that person's followers hear about it too and pretty soon a tweet plus your retweets can popularize a post to the point that it spreads so widely that it goes viral.
Advantages of a Twitter Retweet Button
A Tweet/Retweet button looks similar to and behaves like an integrated Digg button but it counts retweets rather than diggs. A Retweet button counts reposts of a tweet so that readers can see at a glance how popular your article is on Twitter. Another benefit of the Retweet button is that it allows your blog readers to retweet your post so that their followers hear about your post too.
How to Add a Twitter Retweet Button to a Blogger Blog (Blogspot Blog)
The following instructions will place a Tweetmeme Retweet button into all of your blog posts.
Tips and Troubleshooting
In this tutorial you have learned how to add a Tweetmeme Retweet Button to your Blogger posts. The Retweet button will encourage your blog readers to retweet your content on Twitter thereby increasing your blog traffic. I have provided the code for both a large and compact button with the option of left or right alignment. The button appears just below the post title and counts the number of retweets of your Blogger post. I have also included details of how to add the Tweetmeme Retweet button to the foot of your Blogger blog and how to add the button to post pages only.
Related Articles
List of Blog Know How Tutorials for Blogger Blogs
Tips to Add a Digg Button to Blogger Blogspot
Add a Twitter Updates Widget to Blogger
Add Twitter Button or Twitter Badge to Blogger
Add Twitter Followers Counter to Blogger
Add a Social Bookmarking Button to Blogger
Add Social Bookmark Buttons to Blogger
Best Free Social Bookmark Icon Sets for Blogger
Forget the preamble and take me straight to the instructions to insert the Retweet button into Blogger
What is Twitter and How Does it Work?
Twitter is currently the fastest growing free social networking site. Essentially, Twitter users micro blog about what they are doing or what others are doing by posting tweets of around 140 characters to Twitter. When Twitter members read these tweets and like what they read they can become followers much in the same way that your readers can choose to follow your blog.
Twitter is great news for bloggers because it can be used as a vehicle to promote blogs. Blogger can easily be linked with Twitter services so that every time a post is made to Blogger a short message with a link is posted on Twitter. As every follower is notified that you have tweeted, a blog publisher can gain lots of exposure for their blog with very little effort.
Once you add Tweetmeme retweets to the mix the spread compounds because not only do you have followers hearing about your tweet but the followers of followers. So say one of your followers retweets your post all that person's followers hear about it too and pretty soon a tweet plus your retweets can popularize a post to the point that it spreads so widely that it goes viral.
Advantages of a Twitter Retweet Button
A Tweet/Retweet button looks similar to and behaves like an integrated Digg button but it counts retweets rather than diggs. A Retweet button counts reposts of a tweet so that readers can see at a glance how popular your article is on Twitter. Another benefit of the Retweet button is that it allows your blog readers to retweet your post so that their followers hear about your post too.
How to Add a Twitter Retweet Button to a Blogger Blog (Blogspot Blog)
The following instructions will place a Tweetmeme Retweet button into all of your blog posts.
- Login to Blogger if not already logged in
- From the Dashboard navigate to Layout > Edit HTML
- Check the Expand Widget Templates button
- Back up your Blogger template by clicking on Download Full Template as a precaution
- Using CTRL + F find the following code:
<div class='post-header-line-1'/>
- Directly after the above line paste the following code depending on which Retweet button and position you prefer:
- Large Retweet Button - Right Aligned
- Large Retweet Button - Left Aligned

<div style="float:left;padding:4px;">
<script type="text/javascript">
tweetmeme_url = '<data:post.url/>';
tweetmeme_source = 'your_twitter_user_name';
</script>
<script type="text/javascript" src="http://tweetmeme.com/i/scripts/button.js">
</script> </div> - Compact Retweet Button - Right Aligned

<div style="float:right;padding:4px;">
<script type="text/javascript">
tweetmeme_style = 'compact';
tweetmeme_url = '<data:post.url/>';
tweetmeme_source = 'your_twitter_user_name';
</script>
<script type="text/javascript" src="http://tweetmeme.com/i/scripts/button.js">
</script> </div> - Compact Retweet Button - Left Aligned
<div style="float:left;padding:4px;">
<script type="text/javascript">
tweetmeme_style = 'compact';
tweetmeme_url = '<data:post.url/>';
tweetmeme_source = 'your_twitter_user_name';
</script>
<script type="text/javascript" src="http://tweetmeme.com/i/scripts/button.js">
</script> </div>
<div style="float:right;padding:4px;">
<script type="text/javascript">
tweetmeme_url = '<data:post.url/>';
tweetmeme_source = 'your_twitter_user_name';
</script>
<script type="text/javascript" src="http://tweetmeme.com/i/scripts/button.js">
</script> </div> - Large Retweet Button - Left Aligned
- Change your_twitter_user_name for your actual Twitter username. For instance I would enter BlogWizz
- Click on Save Template
- Click on View blog to admire your Tweetmeme Retweet button in your Blogger posts
Tips and Troubleshooting
- To Add Retweet Button Below Blogger Post
If you want the button to appear at the bottom of Blogger posts instead of just below the post title locate the first instance of the following code and then paste the code for your chosen button immediately after this line: (don't forget to change your Twitter username as in Step 7)<data:post.body/>
- To Have the Retweet Button Appear on Post Pages Only in Blogger
If you want the button to only appear on the post pages and not the home page you will need to enclose the button code in an if statement. See below for an example of what the full code would look like with this extra code.<b:if cond='data:blog.pageType == "item"'>
</b:if>
Thus the full code for a right-aligned large Retweet button which only appears on the individual post pages and not the home page would be:<b:if cond='data:blog.pageType == "item"'>
<div style="float:right;padding:4px;">
<script type="text/javascript">
tweetmeme_url = '<data:post.url/>';
tweetmeme_source = 'your_twitter_user_name';
</script>
<script type="text/javascript" src="http://tweetmeme.com/i/scripts/button.js">
</script> </div>
</b:if>
In this tutorial you have learned how to add a Tweetmeme Retweet Button to your Blogger posts. The Retweet button will encourage your blog readers to retweet your content on Twitter thereby increasing your blog traffic. I have provided the code for both a large and compact button with the option of left or right alignment. The button appears just below the post title and counts the number of retweets of your Blogger post. I have also included details of how to add the Tweetmeme Retweet button to the foot of your Blogger blog and how to add the button to post pages only.
Related Articles
List of Blog Know How Tutorials for Blogger Blogs
Tips to Add a Digg Button to Blogger Blogspot
Add a Twitter Updates Widget to Blogger
Add Twitter Button or Twitter Badge to Blogger
Add Twitter Followers Counter to Blogger
Add a Social Bookmarking Button to Blogger
Add Social Bookmark Buttons to Blogger
Best Free Social Bookmark Icon Sets for Blogger
Sabtu, 03 Oktober 2009
October Featured Project - Business Cards

This month, our "Blog Special" is business cards. Mention this blog for a 10% off discount on any new business card project or business card re-order from us.
Our business cards are custom designed, full color, glossy business cards that will give your business the competitive edge over others who just have your plain old, run of the mill, home printed business card.
So if you're running low on business cards, here's a good time to stock up, or if you've been considering getting some but haven't quite pulled the trigger, now's a good time to order. Don't forget to mention the Blog Special 10% discount when you book your new project for business cards with Tricia. To order, call 979-532-9141 or email tricia@ranchhousedesigns.com
How to Align and Justify Blogger Posts
This is the second article in a series about CSS styling tricks and tips for Blogger written with Blogger beginners and novices in mind but suitable for all bloggers who want to customize their existing Blogger template. While the first article dealt with how to add or remove image borders in Blogger today I show you how to align and justify Blogger posts.
| Skill Level: Beginner | Rating: Easy | Time: 1 Minute |
Many of the questions that my readers ask me are about how to customize various features of their Blogger template (Blogspot template). Over the coming weeks I will be focusing on some simple CSS styling tricks and tips to help you get more out of your Blogger template. Much can be achieved by learning a little about CSS. So before you rush off to download a custom Blogger template consider customizing your existing Blogger template.
This tutorial is part of a series of articles that I will publishing over the coming weeks about customizing your Blogger template using CSS styling. I will be targeting beginner bloggers and newbies to Blogger as well as more seasoned bloggers so if you want to spice up your Blogger template please read along.
How to Justify Blogger Posts (Blogspot Posts) Using CSS
It is easy to change the text alignment of your Blogger posts with the addition of one extra line in the CSS styling section of your Blogger template (Blogspot template). By default the alignment is set to left align so that the text aligns to the left while the right edge is ragged. You can also have right alignment where the text aligns to the right and the left edge is ragged.
Another not so common option is to justify the text so that both left and right edges are straight. Users of MS Word and other word processing programs will be familiar with justify as an alignment choice. Justify stretches out the text so that each line has an equal width similar to what you will find in newspapers and magazines. I have found justifying my Blogger posts to be a useful feature on several of my blogs and thought some of you might to. Below are instructions on how to justify your Blogger posts so that all your blog's articles are justified but first take a look at the difference in presentation of these 2 blog posts just by justifying the alignment of the text. Makes a big difference don't you think?


- Before you start check how text is currently aligned on your Blogger posts. If it is left aligned you will be able to follow this trick to justify it. If it is already justified no need to go any further.
- Login to Blogger if not already logged in
- From the Dashboard click the Layout link for your blog and then click on Edit HTML
- Back up your template by downloading it in full as a precaution
- Use CTRL + F to find the code block beginning with .post in the CSS styling section of your Blogger template. As templates will differ greatly there are no hard and fast rules about what styling will be in this block. Here is a typical code block taken from the default Minima Blogger template
.post {
margin:.5em 0 1.5em;
border-bottom:1px dotted $bordercolor;
padding-bottom:1.5em;
} - Add the following line to the code block before the end brace (the end curly bracket)
text-align:justify;
so that your code now looks like:
.post {
margin:.5em 0 1.5em;
border-bottom:1px dotted $bordercolor;
padding-bottom:1.5em;
text-align:justify;
} - Click on Save Template
- Click View Blog to see the alignment of all your posts has now changed to justified
Tips and Troubleshooting
- If your Blogger template justifies posts and you would like to left align them find the code beginning with .post in your Blogger template and add the following line to the block:
text-align:left;
so that your code now looks like:
.post {
margin:.5em 0 1.5em;
border-bottom:1px dotted $bordercolor;
padding-bottom:1.5em;
text-align:left;
} - If you want the posts right aligned you would substitute the word right for left.
In this tutorial you have learned how to justify your Blogger posts to create a straight rather than ragged margin edge. By using this tip to add one line of code to your Blogger template you can enhance the look of your Blogger posts. This tweak only takes a minute but can markedly improve the presentation of your Blogger posts. Please keep reading along for more CSS tips and tweaks in the coming weeks.
Related Articles
List of Blog Know How Tutorials for Blogger Blogs
How to Add, Delete or Remove Blogger Image Borders
Kamis, 01 Oktober 2009
Lot One Magazine
After being out of the office for a few days, when I got back today I noticed a new magazine on my desk-- Lot One. This magazines is published by my good friend Brad Fahrmeier of LiveAuctions.tv. I have some very vintage photos of Brad and I when we were both on the American Junior Shorthorn Association board but I'll just keep those to myself! :)
I consider Brad one of my close friends in this business, and he is someone I really respect for having very out of the box ideas and a great business sense. We chat lots of times on MSN messenger to bounce around ideas. So I am happy to be one of the advertisers in this publication.
I thought this magazine was EXCELLENT! It was the perfect mix of ads, of course, but yet filled with interesting artcles and information that any rancher would love to read. This issue is filled with ranch stories, interests, and hobbies of the cattle business. As Brad states in his article, "It's the one of a kind people, places and cultures that we come across that will be evident in every issue."
I think it's a breath of fresh air to have a publication like this in the cattle business. From stories on how to throw a tailgate party, to a recipe for the "best margarita" to historical articles -- this publication ROCKS.
So I encourage you to look up this magazine. You can subscribe and view the magazine online at http://www.liveauctions.tv/ or if you join the Live Auctions facebook group you can view it there too. Congratulations to Brad and the Lot One Managing Editor - Marissa Mrozinski on a fabulous job!
Langganan:
Postingan (Atom)